Free AR Apps from WSCAD
The modular WSCAD software supports engineering with a wide range of functions for standard-compliant documentation. Modern 3D technology and augmented reality (AR) enable interactive workflows in control cabinet construction, installation technology and building automation.
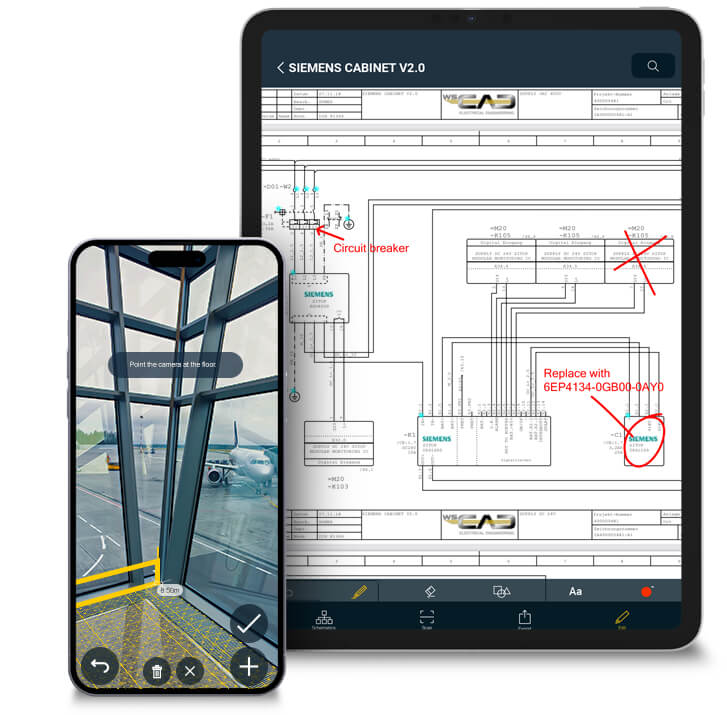
Maintenance and service technicians can scan individual cabinet components with the WSCAD Cabinet AR App and immediately receive information about the component as well as its position in the electrical plans. Using the WSCAD Building AR App, rooms are captured and converted into floor plans for building design and electrical installation.
WSCAD Cabinet AR App – Your digital assistant for control cabinet engineering
With the Cabinet AR App, you can take your wiring diagrams straight to the control cabinet – digital, mobile, and always up to date.
Developed specifically for cabinet assembly and wiring, as well as for commissioning and maintenance of machines and systems, the app enables efficient, error-free and paperless workflows.
Whether you are wiring, inspecting or maintaining equipment – the Cabinet AR App provides all relevant project information at any time, directly on your smartphone or tablet (iOS or Android).
Using Augmented Reality (AR) or the classic 2D view, you can virtually visualise components, check wiring, access documentation and record changes digitally – without paper plans or manual updates.
Would you like to try the app straight away? Here you can find control cabinet assemblies from Siemens and Schneider Electric, including QR codes for testing.
Download Siemens cabinet
Download Schneider Electrics cabinet
Here you can find out even more about professional cabinet engineering with WSCAD software.
The Cabinet AR App is compatible with WSCAD ELECTRIX. It can be downloaded free of charge for smart phone and tablet from the Apple App Store* (iOS operating system) and Google Play* (Android operating system).
![]()
![]()
* Brand names, logos and trademarks used herein remain the property of their respective owners. The listing of any firm or their logos is not intended to imply any endorsement or direct affiliation with WSCAD GmbH.

New in the latest version
The latest version of the Cabinet AR App (November 2025) introduces numerous improvements that make your work in control cabinet engineering even easier and more intuitive:
- Modernised user interface
More space for content thanks to floating “Start” and “Search” buttons. - New project navigator
Quickly switch between project pages using the new, clearly arranged side panel. - Full access to all ELECTRIX disciplines
All project disciplines available within the app. - All symbol texts available
All symbol texts of an element are now displayed in the properties list. - Optimised wiring list
New colour-coded display for connections and wire cross-sections. - Enhanced indicators
Connection indicators now also available on sub-elements.
Proven features of the Cabinet AR App
In addition to the new features, the Cabinet AR App continues to offer everything you need for your daily work in control cabinet engineering:
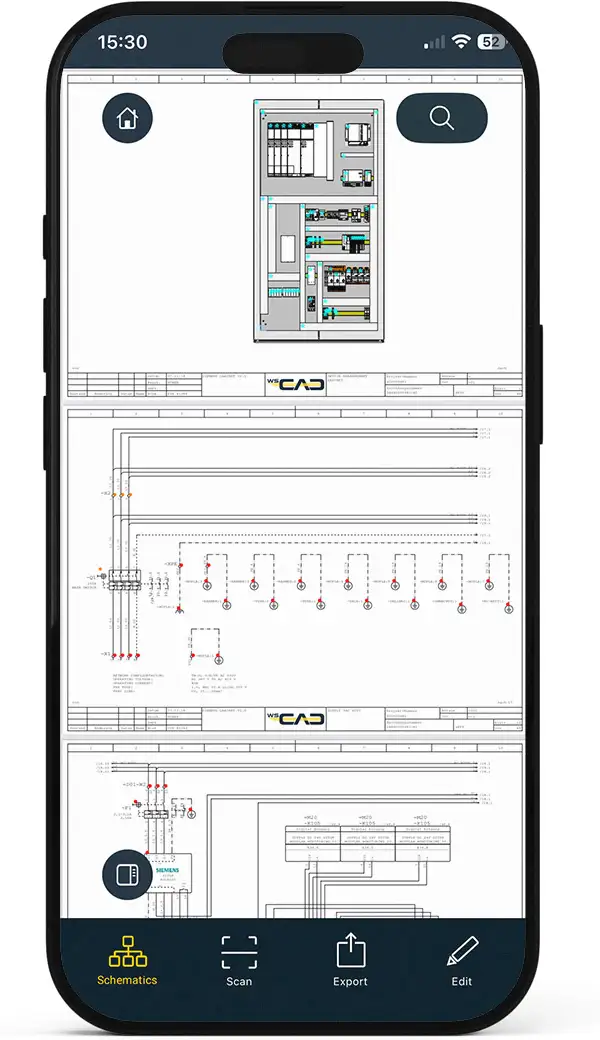
- All your projects available digitally
Clear, digital wiring diagrams directly on your mobile device. - Retrieve component information
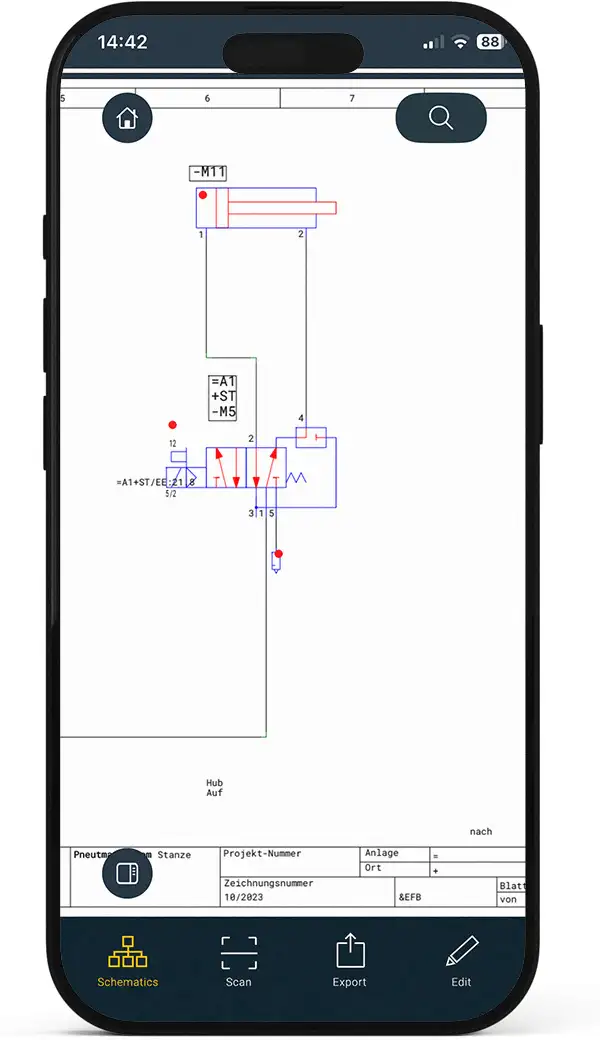
By scanning the WSCAD QR code or manually entering the reference designation (RD). - Circuit diagram view & navigation
Select components to view their properties and wiring. - Wiring status at a glance
Colour-coded connection indicators using the familiar traffic-light system. - Redlining function
Add changes and comments directly in the app. - Edit wiring information
The wiring list shows all connections between components. - Fast component search
Cross-project search by reference designation (RD) or function descriptions.
Modernised user interface
More clarity, more space for content: the top menu bar has been replaced with floating “Home” and “Search” buttons. This keeps the focus entirely on the schematic – ideal for working on tablets or smartphones.
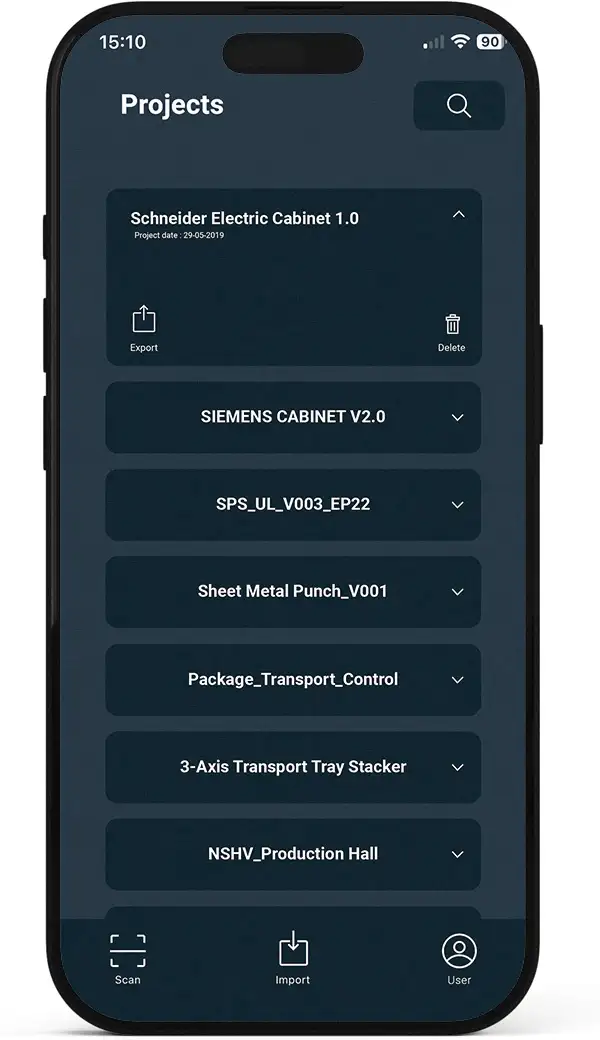
All your projects at your fingertips
Save space and resources by keeping your digitised schematics neatly organised on your mobile device (iOS or Android). Paper schematics become unnecessary, and any changes are instantly accessible to all users. Notes are never lost, ensuring smoother maintenance and preventing errors.
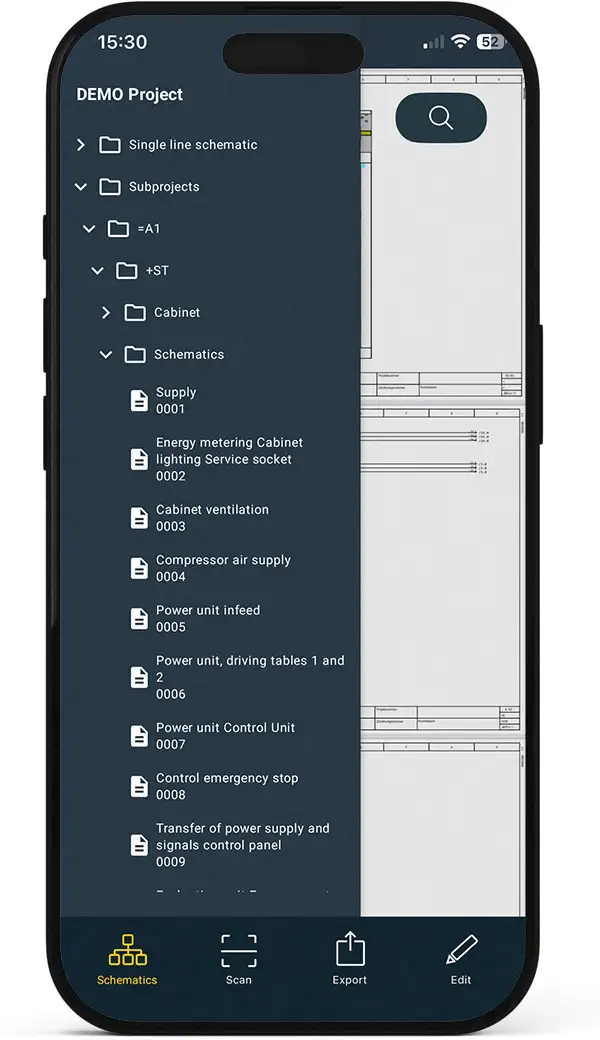
New project navigatorr
The new, clearly structured side panel allows you to switch quickly between project pages. This lets you navigate extensive projects with ease, without the need for excessive scrolling — perfect for large projects with numerous schematics.
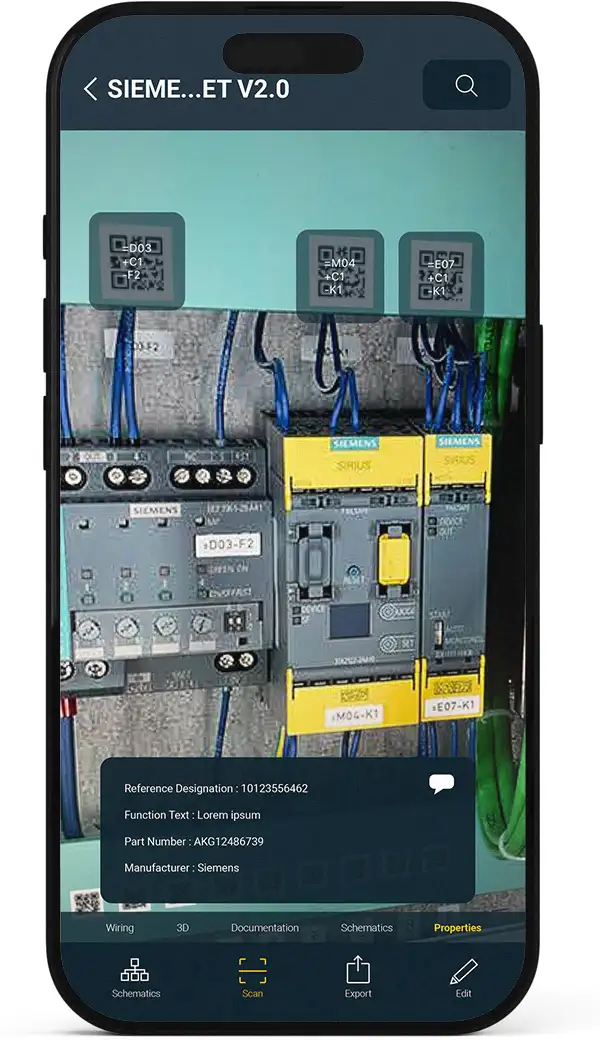
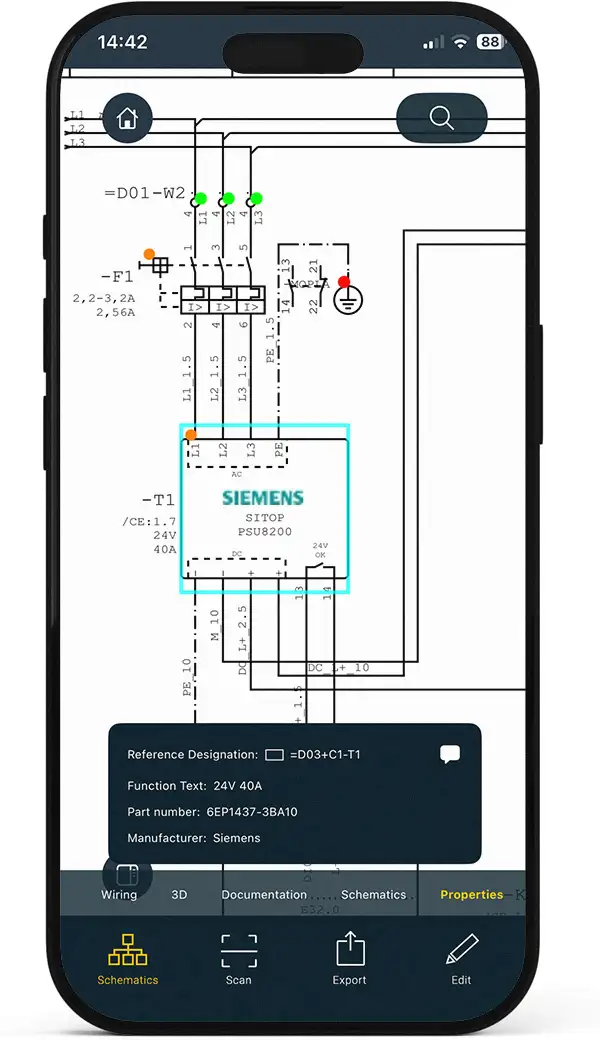
Retrieve component information
Whether by scanning the WSCAD QR code with your device’s camera or by manually entering the Reference Designation (RD), you’ll receive all relevant details about your component within seconds:
- Reference Designation (RD), function text, part number, manufacturer, and all symbol properties stored in the project
- Wiring information (target 1, target 2, potential, cross-section, colour code)
- 3D model (including zoom and 360° rotation)
- Datasheet and documentation via the manufacturer’s website or wscaduniverse.com

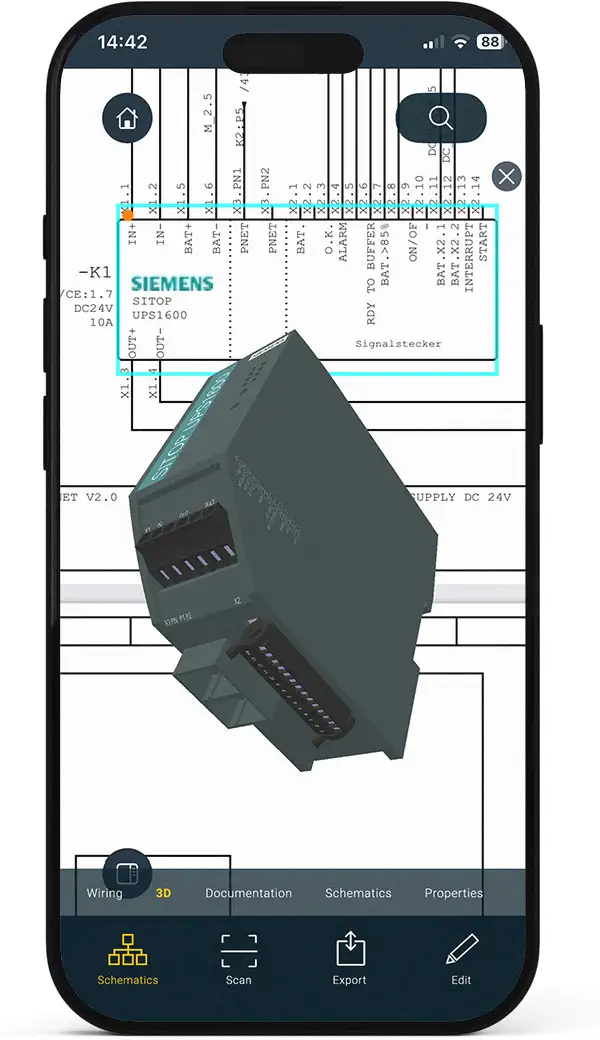
Display components in the circuit diagram
Switch seamlessly between component views within the circuit diagram and the cabinet layout. Using the blue tap points (star icon ), you can select components and display their information such as wiring and properties. Since the November 2025 update, all symbol texts of an element are now shown in the properties list. This makes it easier to identify and document individual components.
With the comment button (speech bubble icon ) in the component information, you can add notes to components.
Via the Documentation button, you can access additional information such as datasheets, and under 3D, you can view the component in 3D.
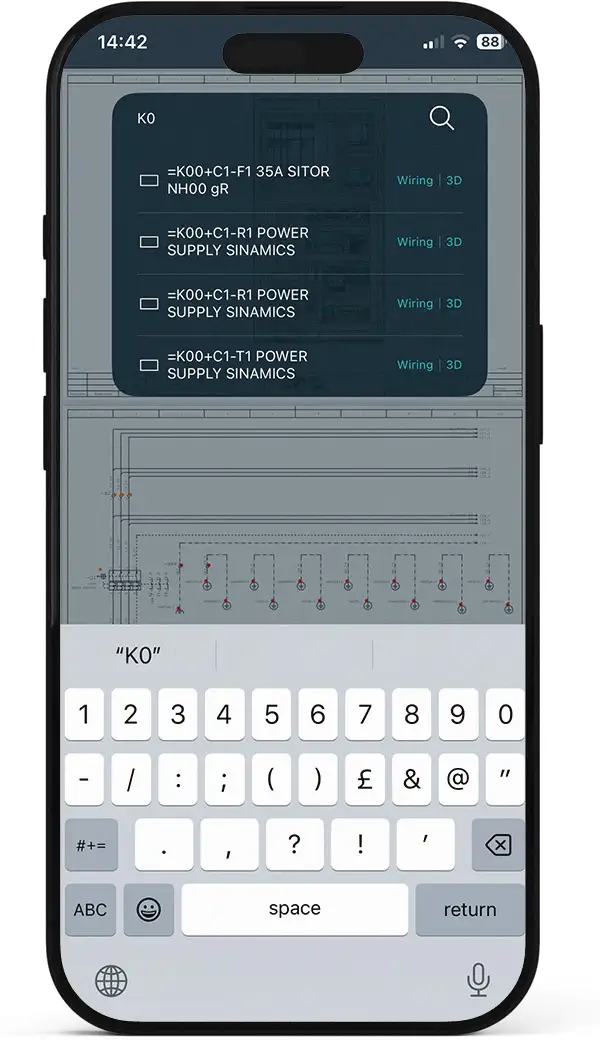
Part search
Using the search function via the magnifying glass icon , you can find parts across schematics by Reference Designation (RD) or function description. Additionally, the wiring list and 3D view of a device can be accessed directly from the search results, eliminating the need to scroll through and navigate long lists.
Full access to all ELECTRIX disciplines – directly in the app
Since the November 2025 update of the Cabinet AR App, you can view all disciplines of a project exported from ELECTRIX (from version 7.3.2.x – “ELECTRIX AI Update 2”) directly in the app, including Electrical, Fluid, Building Automation, and Process Engineering. This gives you complete access to your documentation anytime, anywhere.
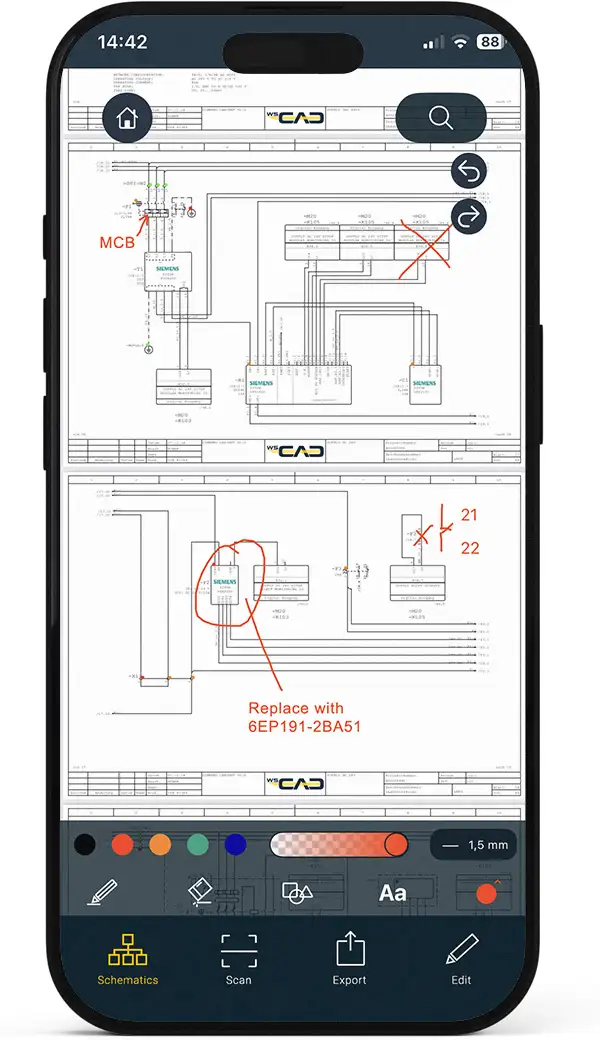
Insert corrections using the “Redlining” function in the schematic
Changes and comments can be added directly within the app – no paper, no manual transfer. All adjustments can, for example, be shared via email for further processing.
Display wiring status
The colour-coded connection indicators using a traffic-light system allow you to see the wiring status of individual devices at a glance. By selecting a component via the coloured circles ( ), you can view its information, such as wiring and properties.

Edit wiring information
The wiring list provides a clear overview of all connection details between components. Additionally, you can “check off” the connections (wires) you have just wired on-site in the control cabinet to mark them as completed. Each row represents a single connection (wire).
With the November 2025 update, the display of connections has been further improved:
- Fully wired lines (both ends verified) are now highlighted in green.
- Wire colour is now displayed as a standard property next to source and target in portrait view.
- Wire cross-section is also shown, providing even greater clarity when checking and wiring.
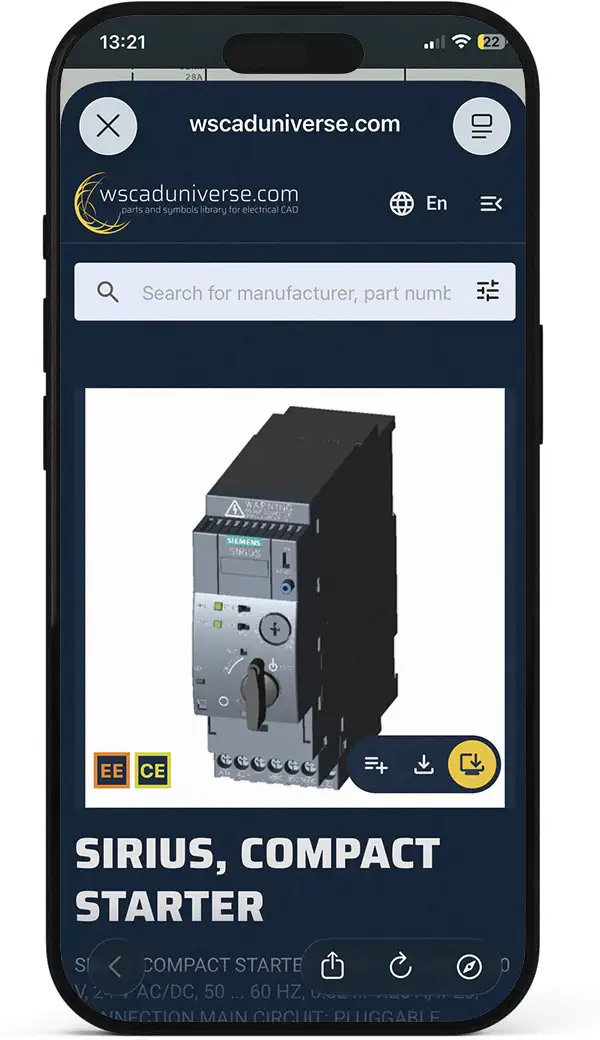
Additional part information
Using the Documentation button, you can access further details about the part directly via the manufacturer’s website or the WSCAD parts database at wscaduniverse.com.
WSCAD Building AR App
With the WSCAD Building AR app, you can create a building plan using your mobile device (tablet or smartphone) and then import it as a background into the WSCAD schematics. To do this, simply scan the rooms of the building with the camera of your mobile device and merge the rooms and floors into a plan as DXF or PDF.
The Building AR app is compatible with WSCAD ELECTRIX. It can be downloaded free of charge for smart phone and tablet from the Apple App Store* (iOS operating system) and Google Play* (Android operating system).
![]()
![]()
* Brand names, logos and trademarks used herein remain the property of their respective owners. The listing of any firm or their logos is not intended to imply any endorsement or direct affiliation with WSCAD GmbH.
Functions of the Building AR app at a glance:
- Create/open project
- Scan room
- Add windows and doors
- Structure rooms
- Display plan
- Export plan
- Import plan into WSCAD software


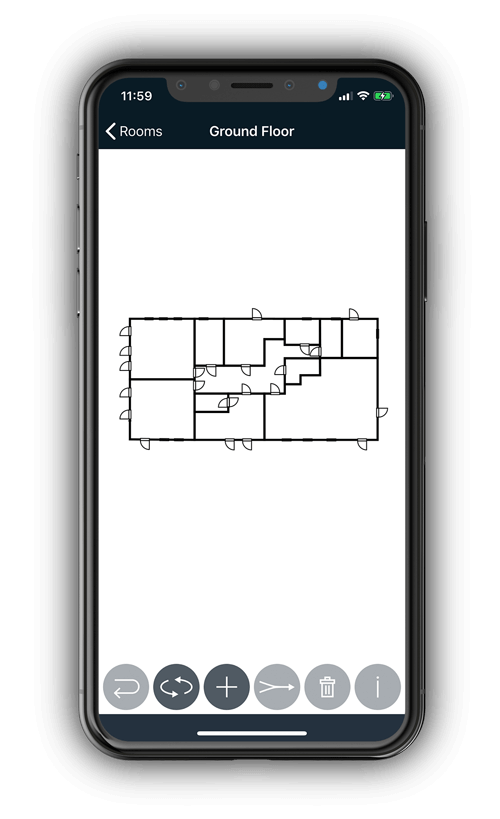
Capture rooms
After you have created a new project in the app, you define all the corner points on the floor of the room and also a corner point on the ceiling with the camera of your mobile device. This way you have recorded the floor space and the height of the room.
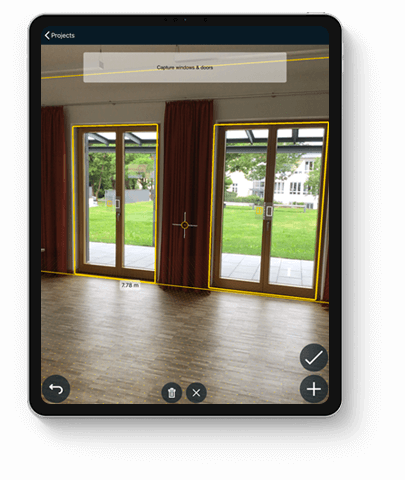
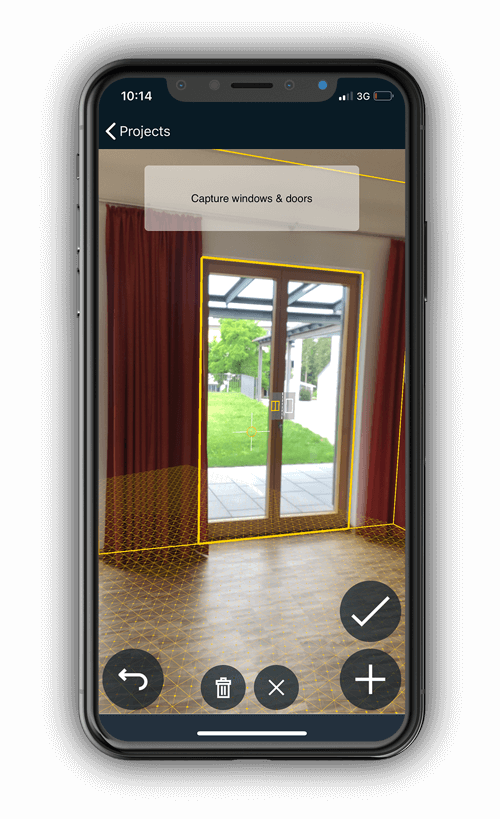
Add windows and doors
In addition, you can drag frames over the windows and doors of the room and add them to the plan. Finally, assign a room number and optionally a room name and a room type for the room. Now you can enter additional rooms and combine them into one floor.
Rotate plan
Combine several rooms into one room
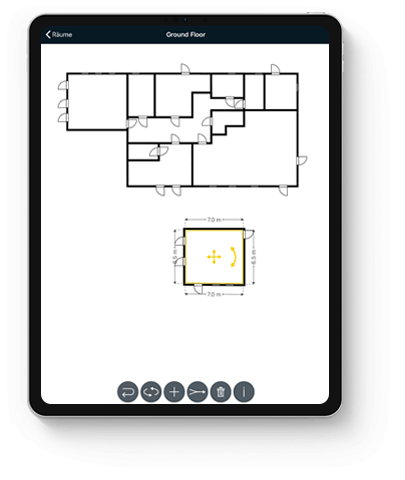
Edit plan
For each floor you can call up the plan with the included rooms. You can use the Merge icon to combine several rooms into one room and the Rotate icon to rotate the entire plan. If you tap on a room, the whole room is displayed below the plan with its room dimensions. Here you can move and rotate the room.
Manage projects clearly
Measuring rooms simply via the camera
Create floor plan easily
Hintergrundverlauf
Hintergrundverlauf
